What is Azure Private Endpoint?
Azure Private Endpoint is a feature within most Azure products that allows you to create a private connection to the resource within Azure, instead of routing through the public internet. It can come in handy when due to either compliance reasons or architecture of your infrastructure, you need to keep communication between your Azure resources within the confines of your network. There are several different scenarios where it can be applicable.
In this article, we will explore what it is, how to configure and use it, and some scenarios that you might run into in the real world.
Example of Azure Private Endpoint
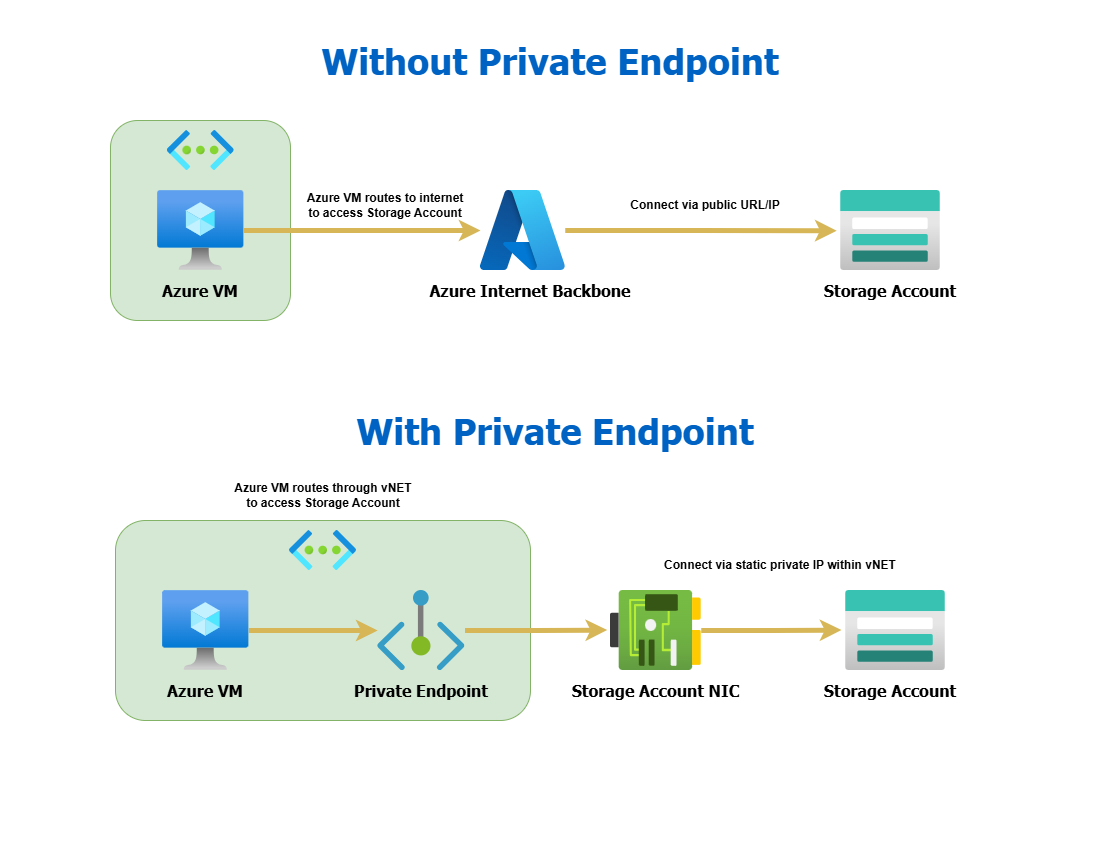
Lets say for example you have an Azure Virtual Machine that needs to access a Storage Account File Share. There are two ways you can access the storage account in this case.
Without a private endpoint, you would route over the public internet to retrieve the content of your storage account file share. Secured via HTTPS, this is still a secure option, but has some drawbacks. For one, this might not fall within compliance for your businesses compliance standard. The data technically, does not stay within your controlled networks. This also might be an issue you are using a virtual appliance for routing in Azure such as a virtual firewall. Accessing large files could put a significant strain on said appliance, causing network slow downs.
With private endpoint, you’d be accessing the Storage Account with a private IP, within your Virtual Network (VNET). This makes it so you can directly route to the resource without necessarily having to route the public internet backbone. You can even disable public access to the storage account after setting this up.
How to deploy Azure Private Endpoint Link?
Create endpoint resource
The first step of deployment is to create the endpoint resource. Follow these steps to create a an endpoint resource for a storage account file share:
- Navigate to your Storage Account resources in Azure and under the Security + Networking tab, select Networking.
- Select Private Endpoint Connections in the top navigation.
- Click the + Private Endpoint button to start the creation wizard.
- Basics – Enter details for the private endpoint instance including name, interface name.
- Resource – In the case for storage accounts, for private endpoints you need to specify what kind of storage account resource you will be accessing. In our example, we’ll use file.
- Virtual Network – Specify which network (VNET and Subnet) that’d you like the private endpoint IP to be on. On this page you will also allocate the IP address. I recommend setting it statically (think of it akin to a traditional file server, you wouldn’t want that to be on DHCP).
- DNS – This depends on how/when you are configuring. If you are not sure what your configuration looks like, I recommend to keep this setting on.
- Review and Create – Once finished reviewing, create the resource.
Now that the resource is created, you can technically use the private endpoint now using the private IP designated to the endpoint. However, in most cases, we want to use DNS. The second part of deployment is configuring DNS to correctly resolve to the private IP for the endpoint.
Deployment Scenarios
The deployment of Azure Private Endpoint, can be a bit of challenge though, because a lot depends on your environment architecture and configuration. Please see the list of example scenarios below and continue to follow the guide on the one that suites you best.
- Scenario 1: DNS server/DNS relay in Azure with on-prem resources.
- Scenario 2: No DNS server/DNS relay in Azure with on-prem resources.
Scenario 1: DNS Servers in Azure
This is probably by far the most common scenario that I have run into while working with Azure Private Endpoint. Usually, admins opt to have a DNS server or relay in Azure, such as a domain controller running as a virtual machine. If you already are using a storage account (i.e., it’s in production) and want to switch to private endpoints, having this DNS server will make it seamless and without interruption.
Inside of the DNS server, we’ll want to create a conditional forwarder zone for our storage account URL. So for example, if your storage account URL is itguidebook.file.core.windows.net, we’d want to create a forwarder with that zone name and point the forwarder to Azure DNS (which at the time of writing this is 168.63.129.16). Creating this will allow any client using this DNS server as its resolver to resolve the storage account URL to the private endpoint IP address.
On the backend, what happens is that Azure DNS will resolve any request coming from Azure VNETs (like our DNS server), for the storage URL to a private IP. If it is coming from anywhere else, Azure DNS and other DNS providers will respond with the public IP.
Once this is configured, next time a client attempts to resolve the storage account URL using this DNS server in Azure, it will go to Azure DNS and give back the private IP. You can theoretically configure forwarders for on-premises DNS servers if you want on-prem resources to access storage accounts via your VPN site-to-site into Azure. You’d simply have to set up the forwarder to point to the DNS server in Azure, and then that DNS server will forward the request as we set it up above.
Scenario 2: No DNS Servers in Azure
This scenario assumes that you have a site-to-site connection between Azure and your on-premise infrastructure. In this case, if you want your on-prem clients to resolve to the private IP for the storage account URL, you’d simply create an A record for the zone in your DNS server. We cannot use forwarders as the DNS server does not reside within an Azure VNET, thus Azure DNS will reply with the public address instead of private.
Keep in mind, this means that all clients that use the on-premise DNS server, will resolve the url to the private IP. Depending on your scenario, this may/may not be favorable.
Other Scenarios
There could be a variety of other scenarios based on configuration and architecture that I may have not mentioned. If that is the case, please feel free to reach out to me or leave a comment on this post and I would be more than happy to work with you on your situation.
Wrapping Up
With this configured you can enjoy accessing the Storage Account, or any other Azure resource via a dedicated private link using a private IP address. This allows for several other capabilities such as being able to disable public access to a resource for compliance, security or other purposes.