Introduction and Prerequisites
Making sure SentinelOne is deployed across all endpoints in your environment is crucial to cover your attack surfaces. If you have a Windows Active Directory environment, one of the easiest ways to deploy SentinelOne is through Group Policy (GPO). As a side note, if you use Intune, it’s preferred to do it through there.
You will two things before implementing a group policy. First, login to your SentinelOne console portal and navigate to the desired site or group within the site for which you are setting up the group policy. In the site settings navigate to Packages and download the “MSI” package. It must be an MSI, EXE won’t work using this method.

Under Site Info or Group Info, depending on where you want the agents to go, find the Site/Group token. This long string will be used to uniquely identify the location you wish to install the agents.
Create Directory in netlogon folder
Login to your domain controller and navigate to the following directory to create a new folder with the name SentinelOne (C:\Windows\SYSVOL\domain\scripts\).
This is the local path for the netlogon folder, everything you place here will be in the netlogon folder (\\mydomain\netlogon).
In this folder we will place the installer we downloaded. Make sure to rename it to SentinelInstaller_windows.msi as that will be important in terms of the script. After we create our batch script we will also place it in this folder.
Create Batch Script
This script will be used by your endpoints to run the MSI installer as well as passthrough the site/group token that we copied earlier. You will need to modify the following in the script to make it work for you: SITE TOKEN and NETLOGON PATH.
@ECHO OFF

REM Check registry for key to see if SentinelOne is installed.
reg query "HKLM\Software\Sentinel Labs"

REM If directory exists, SentinelOne has already been installed, exit the script.
IF %ERRORLEVEL% == 0 EXIT

REM If directory doesn't exist proceed with installation. Copy the MSI installer from your NETLOGON PATH to TEMP folder.
copy \\mydomain.local\NETLOGON\SentinelOne\SentinelInstaller_windows.msi C:\windows\temp\ /Z /Y

REM Install the MSI package
msiexec /i "c:\windows\temp\SentinelInstaller_windows.msi" /q /norestart SITE_TOKEN="SITETOKEN"

REM If install fails, throw error
IF %ERRORLEVEL$ != 0 echo "Failed to install SentinelOne"
You can copy the contents above, place into Notepad and “Save As”. For the name make sure to end it with a .bat extension and you have “Save as type” set to All Files. Place this script in the folder we created in the step above.
Create Group Policy
Open your Group Policy Management console and create a new Group Policy and link it at the desired level. For my example, I will be creating it at the root, choose any OU that makes sense for you. If you have multiple OUs that need it, you can link the same Group Policy to them later.
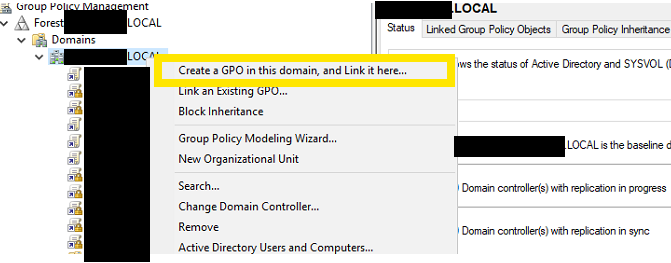
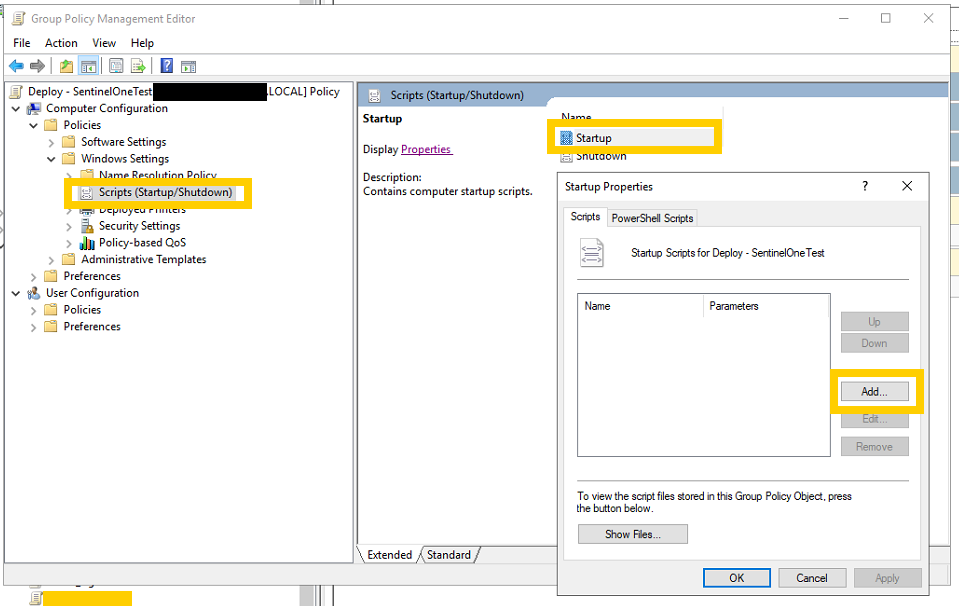
Right click on the newly created group policy and navigate to Computer Configuration > Policies > Windows Settings > Scripts (Startup/Shutdown). Select Startup and click the Add button.
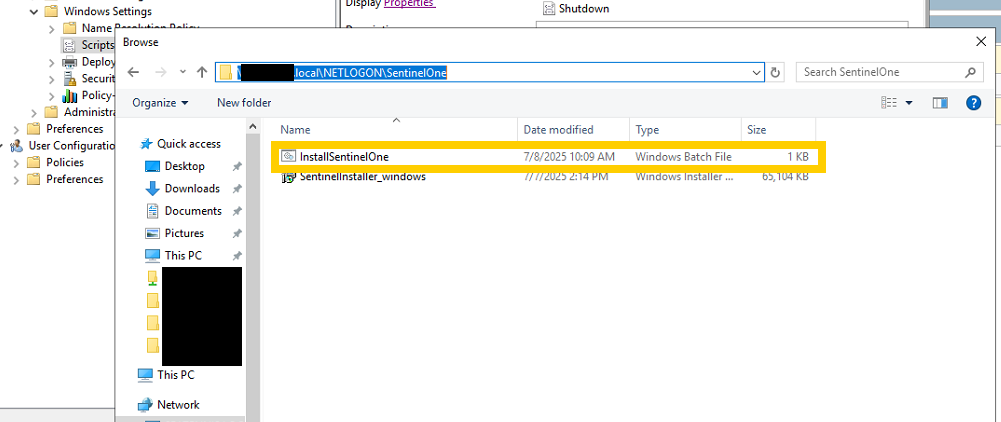
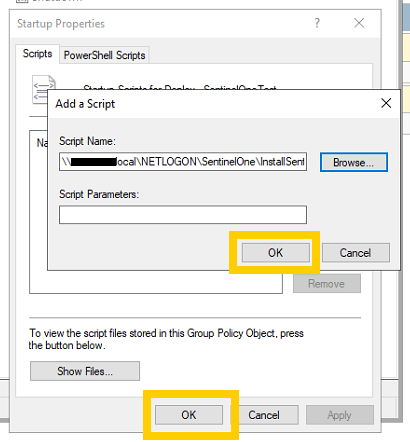
In script location, hit Browse and navigate to your netlogon folder (not local URL but the domain URL starting with \\domainname.local\netlogon\). Navigate to the SentinelOne folder and select the script we created and placed in this folder. Once select the script, hit OK and then click Apply and OK to confirm.
Congratulations, you have created a Group Policy for deploying SentinelOne. You can now test is on an computers within the OU by restarting them and logging in. The install should be really quick. Keep your eyes peeled on the SentinelOne Console for the new agent to check in. Remember, for full functionality of the SentinelOne agent, the endpoint will require a reboot.